The Battle of Diamond Hill took place on the 11 and 12 June 1900. Sir Ian Hamilton, one of the generals who took part in the battle, described it as the turning point in the South African War, so in this Memoir we look at what happened and why it was so important.
The Battle of Diamond Hill (from V. Carruthers. The Magaliesberg)
An earlier Memoir told how, as Lord Roberts, Commander in Chief of the British forces, prepared to occupy Pretoria on 5 June 1900, General Louis Botha left to rally the remnants of the Boer army. Botha had been persuaded to continue the war by the Free State President Martinus Steyn and further encouragement now came with the news that Christiaan de Wet’s Free State commandos were wreaking havoc with the extended British line of communication between Pretoria and Cape Town. British columns had been defeated at Lindley and Heilbron and rail links were repeatedly being disrupted. The Transvaal commandos were despondent and exhausted after months of defeat and retreat and many had returned to their farms thinking that the war was over. But, encouraged by Botha’s revived determination and the news from the Free State, a core of about 5000 burghers were still willing to fight on. They assembled at Donkerhoek pass, which today carries the modern N4 highway through the Magaliesberg range about 30km east of Pretoria.
While the situation in the Free State invigorated the Boers, it had Lord Roberts increasingly concerned. Despite his overwhelming military dominance, he was conscious of being deep in hostile territory where the loss of his supply line would be extremely serious. He sent two of his top generals, Lord Kitchener and Lord Methuen, to quell De Wet’s activities and, at the same time, he sent emissaries to try once more to persuade Botha to surrender. Both tactics failed and when he realised that the Boer commandos were being deployed for battle, Roberts decided to send 14 000 men to destroy this remnant of Boer resistance.
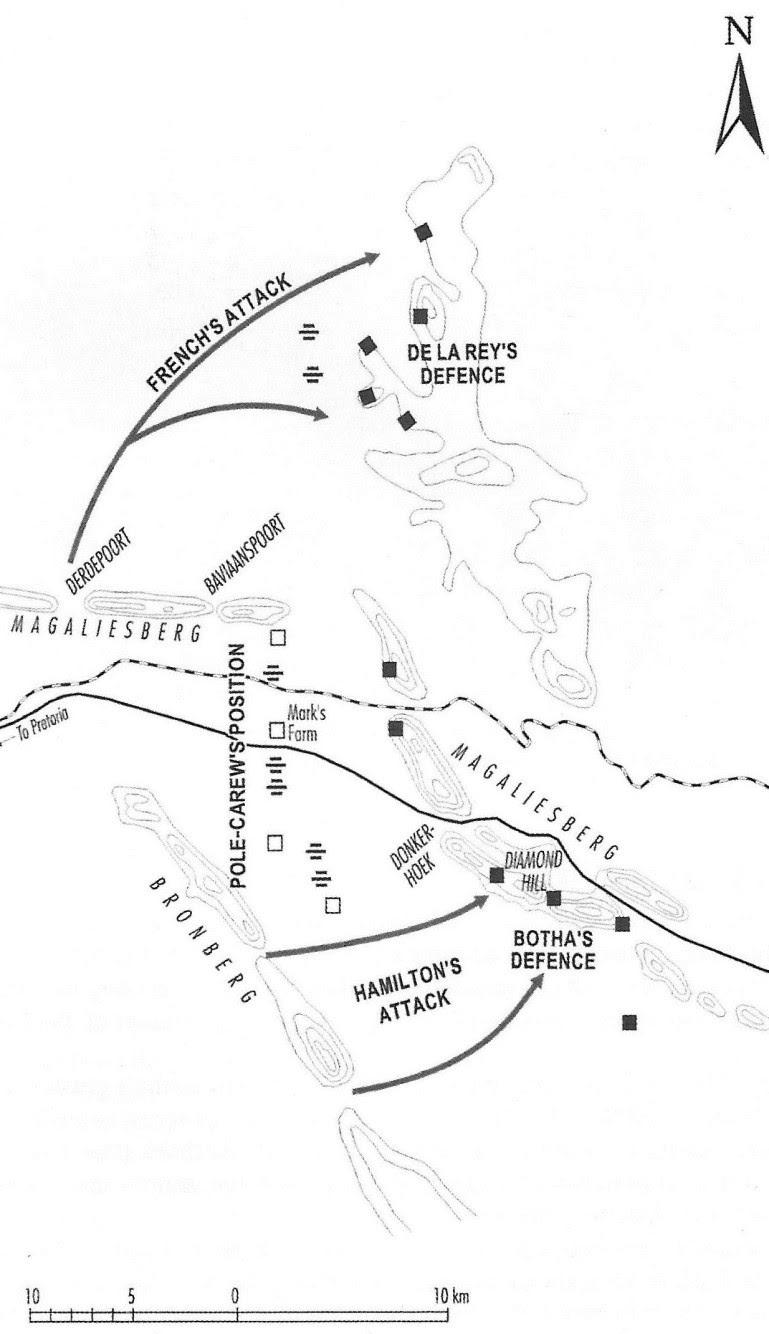
Confronted by an army almost three times the size of his own, Botha anticipated that the British would attempt a classic pincer movement to try and surround him. His greatest threat came from being outflanked, so he arranged his forces across a wide front that straddled the Magaliesberg on either side of the Donkerhoek pass. Knowing that Roberts had an aversion for frontal attacks, Botha left the pass only weakly defended, concentrating his limited manpower towards the ends of his long line of defence. General de la Rey took command of the right flank stretching some 20km north of Donkerhoek while Botha himself commanded the left flank for a similar distance to the south. A 40km front was thus covered by just 5000 men.
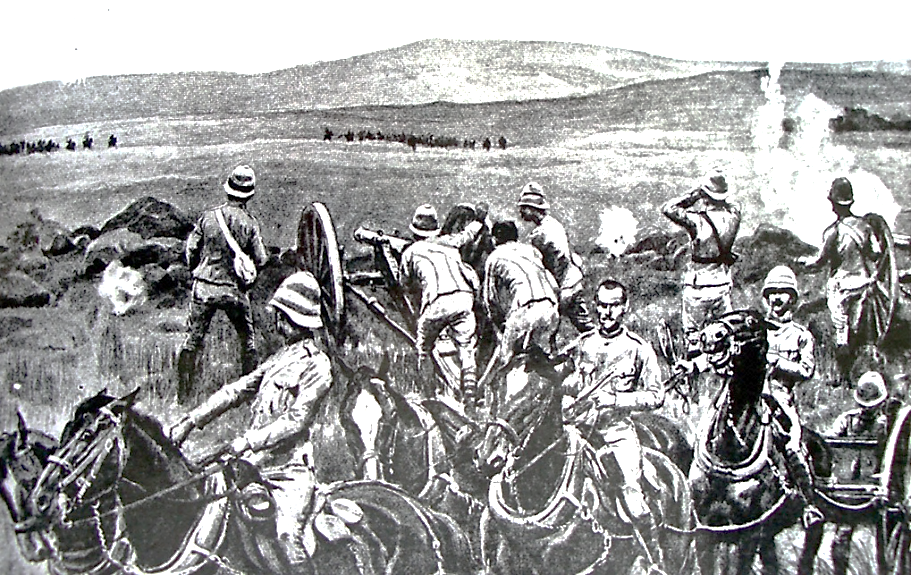
Lines of infantry (middle distance) advance against the concealed Boer positions on Diamond Hill (from the Illustrated London News)
Botha had anticipated Roberts’s battle plan correctly. Roberts sent Lieutenant-General Ian Hamilton along the base of the Bronberg ridge with 3000 cavalry and 2200 infantry ready to sweep around the south of the Boers and take a high plateau called Diamond Hill. General French with two cavalry and mounted infantry columns was poised to execute a similar manoeuvre to the north, passing close to what is now the Roodeplaat Dam and the Premier Mine at Cullinan. In the centre, Lieutenant-General Sir Reginald Pole-Carew waited with detachments of infantry and artillery on the Pienaars River with guns trained on the road and railway through the Donkerhoek and Pienaarspoort passes. His instructions were not to move until the two arms of the pincer had closed behind the Boer lines.
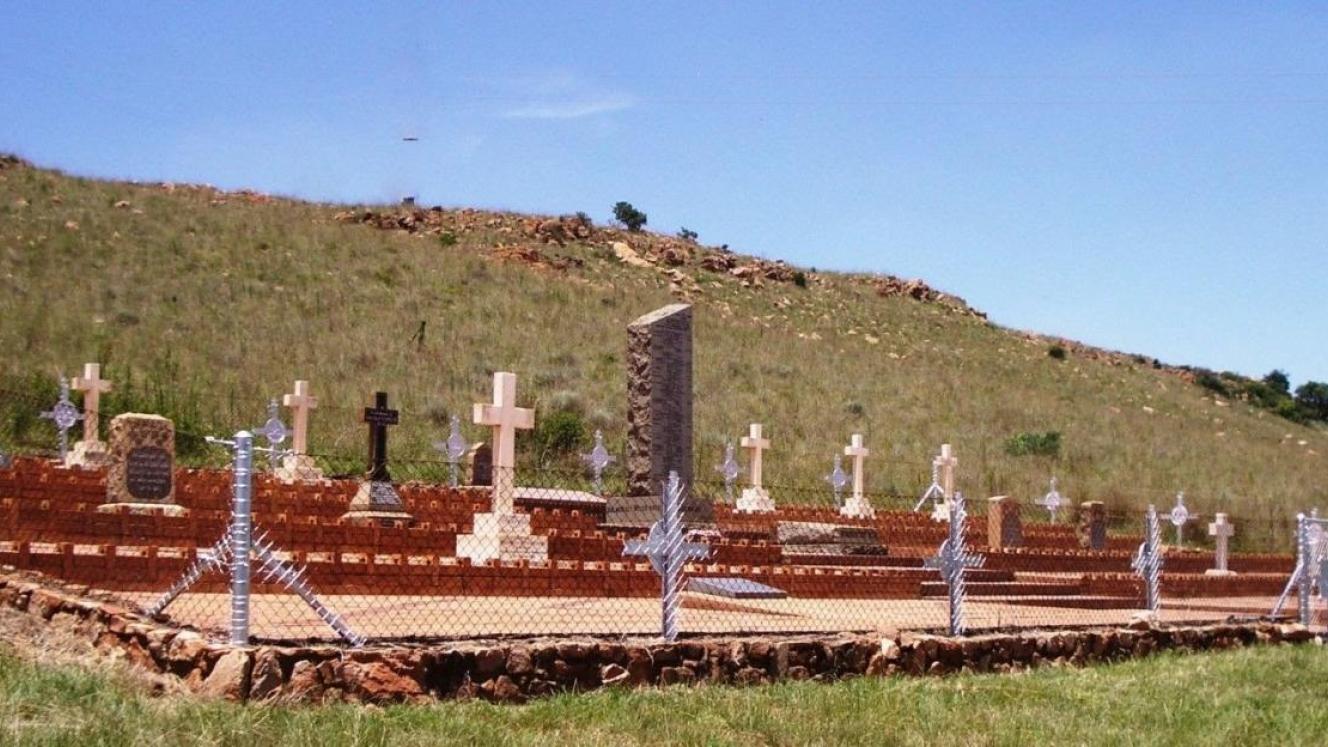
From the beginning of the battle the Boer tactics proved superior. Their line of defence extended well beyond the points at which the British flanking movements attacked and both northern and southern pincers were trapped in fierce Boer crossfire. In the south where Botha was directing the Boer defence himself, Hamilton’s cavalry was almost surrounded while his infantry was held at bay on the slopes of Diamond Hill. At the height of the battle Lieutenant-Colonel David Ogilvy, 11th Earl of Airlie, the quintessential Eton-educated Victorian cavalry officer, led a gallant assault by the 12th Lancers to clear the Boers from their position. Charging with lances and sabres against close-range rifle-fire, Lord Airlie was killed along with two of his officers and several men.
In the north, a similar stalemate had been reached. French’s column of 1400 cavalry, mounted infantry and field artillery had been immobilised by commandos under General Koos de la Rey. The two sides exchanged deadly close-range fire from which neither would retreat.
At the centre, where Boer defence was weakest and where the largest British force was concentrated, Pole-Carew’s involvement was restricted to an ineffectual long-range artillery bombardment of the almost empty pass.
That night the two armies were locked in an impasse and the outcome of the battle could have gone either way.
The following day, 12 June, Roberts was persuaded to allow some of Pole-Carew’s infantry to go to Hamilton’s aid on Diamond Hill. However, he still refused permission for a frontal attack on the Donkerhoek pass, an action which would almost certainly have won him the day. On Diamond Hill, the Boers had taken advantage of the Magaliesberg terrain and from the cover of rocky outcrops they fired upon the advancing British troops as they scrambled up the hill. The British suffered severe casualties, but their officers kept sending rank after rank against the well-concealed Boer rifles, until the hill was eventually captured, late in the afternoon.
In the north General French’s dismounted horsemen were in still in serious difficulty and the Boers were gradually gaining the upper hand. De la Rey sent a message to Botha that, given reinforcements, he could wipe out French’s column and fall on the British centre. Botha, however, could not spare anyone from Diamond Hill and so French survived the second day.
With Diamond Hill in British hands, the battle was still not over but the broader strategic outlook was very different for the two sides: if the British were defeated they would lose a battle; if the Boers were defeated they would lose the war. Botha was aware of this distinction and that night the Boers quietly vacated their positions in the mountains and retreated to the east without mishap. Technically it was a British victory, but it had been accomplished at great cost and, more importantly, the Boer forces were no closer to capitulation. Indeed, the despondency of the recent past seemed to have lifted and Jan Smuts recalled in his Memoirs: “So ended the battle of Donkerhoek – in defeat for the Boers but with an inspiring effect which could scarcely have been improved by a real victory.”
The battle of Diamond Hill is described in most books about the South African War, including my own, and for this Memoir I have dipped into more of them than I can list here. Principal among them are The Times History of the War in South Africa, Michael Barthorp’s The Ango-Boer Wars 1815 – 1902, and Jan Smuts Memoirs of the Boer War, edited by SB Spies and Gail Natrass, as well as others.
Main image: The British cemetery at Diamond Hill. The Earl of Airlie’s headstone is the large white cross to the left of the central cenotaph.
About the author: Vincent Carruthers has written several books including The Magaliesberg (four editions), Cradle of Life (2019) and The Wildlife of Southern Africa (three editions). In 2006 he initiated the project to have the Magaliesberg region declared a UNESCO Biosphere Reserve. He has received awards from various institutions including the University of the Witwatersrand Gold Medal in 2016 and the North West University Chancellor’s Medal in 2013. He has been CEO of WESSA, chairman of Birdlife South Africa and member of the North West Parks and Tourism Board. Currently retired from his management consultancy, he is enjoying writing for the Magaliesberg Association for Culture and Heritage.