After the occupation of Pretoria in June 1900 the British had controlled many of the large towns in the Transvaal Republic, but the Boers were still strong in the Magaliesberg rural areas and Rustenburg was virtually besieged.
The route between Pretoria and Rustenburg crosses the Magaliesberg through two passes a few kilometres apart, Silkaatsnek and Kommandonek. These strategically important positions were guarded from the Rietfontein Camp (now the south-eastern shore of the Hartbeespoort Dam) by contingents of the Royal Artillery and the Scots Greys cavalry under the command of Lieutenant Colonel the Hon. W.P. Alexander.
On 11 July 1900 (The First Battle of Silkaatsnek), Alexander and his men were due to join similar-sized column of mounted infantry and artillery under the command of Major-General Smith-Dorrien coming from Krugersdorp and the combined force was to clear the Boers from their Magaliesberg strongholds and relieve the pressure on Rustenburg (click here to read about the Battle of Dwarsvlei).
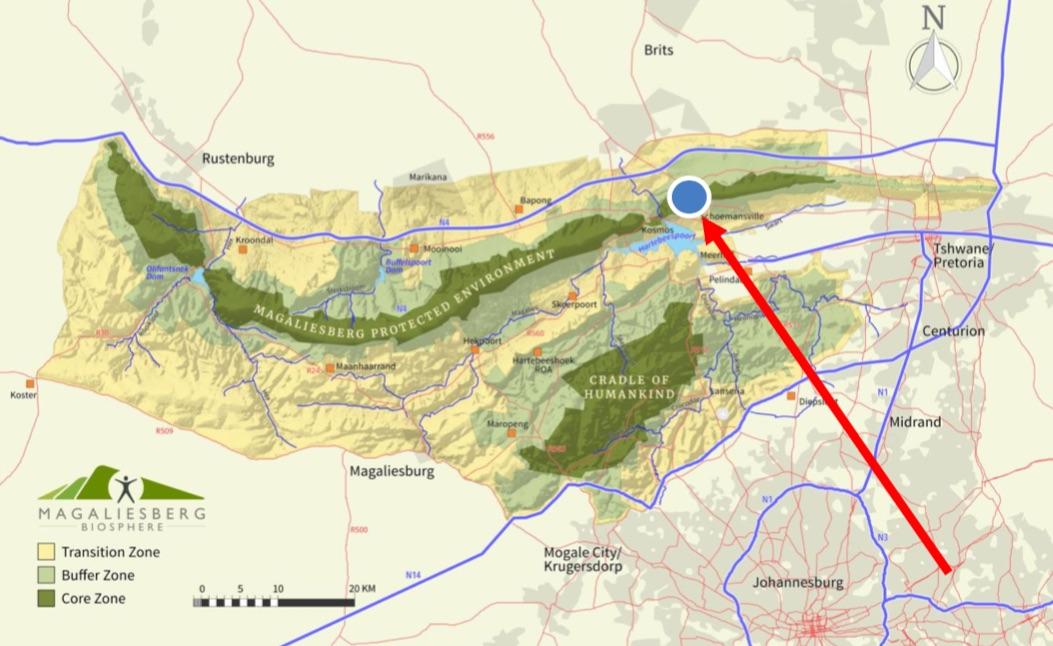
Location of the First Battle of Silkaatsnek
The evening before their departure Colonel H.R. Roberts (not related to the Supreme Commander) brought a battalion of the Lincoln Regiment to replace Alexander’s Scots Greys at the Rietfontein camp. The Lincolns camped at Silkaatsnek about ten kilometres from Alexander’s position but Roberts failed to place guards on the summits of the two high cliffs that overshadowed the nek. His entire defence was thus located at the southern entrance to the pass.
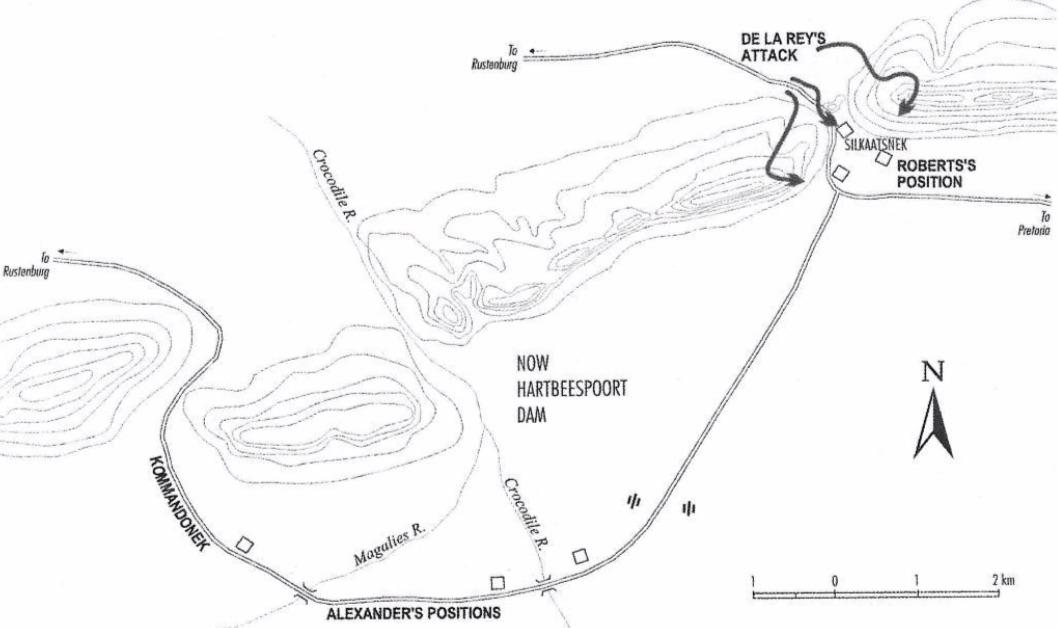
Sketch of the battle
Meanwhile General de la Rey’s commandos, which had been gathering in the bushveld to the north of the pass, stealthily climbed the mountains which Roberts had neglected to secure. At dawn the British guards saw the Boers on the summit, but they were unprepared for battle. Their guns were too close to the cliffs and could not be elevated to train on the Boer positions above them.
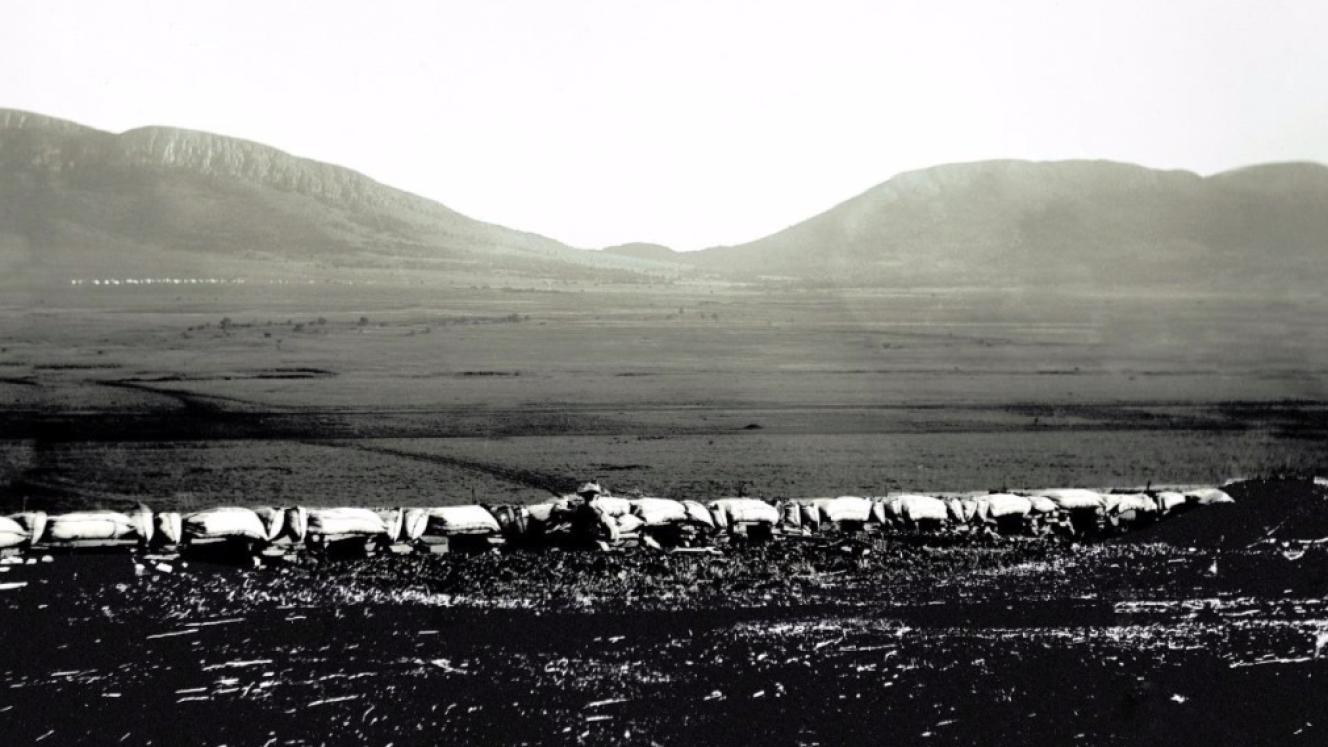
Signalling gear was exposed to Boer fire so no help could be summoned. When the British moved into the pass to attack, De la Rey’s men worked around to the south, trapping them in a low-walled redoubt on the low koppie in the middle of the pass, visible in the photograph above.
Meanwhile, Alexander made no move at all, in spite of being within easy earshot of the gunfire that had commenced at dawn. Eventually, at about 9:00, a runner reached him with an appeal for help. For an hour Alexander shelled the Boer positions on top of the mountain and this helped to relieve the pressure on the Lincolns who were trapped below. Then, inexplicably, Alexander decided that the day was lost and, to avoid any possibility of his own defeat, withdrew his support. At midday he signalled to the remainder of his force to evacuate, and he retired to Pretoria abandoning Roberts to his fate.
Roberts’s men held out until the evening before they surrendered. By that time 72 of the 240 had been killed or wounded. The Boers had also suffered losses, including De la Rey’s nephew, but their victory was undisputed and, combined with the other successes of the day at Dwarsvlei and Onderstepoort, it greatly improved Boer morale throughout the Transvaal.

The graves of those who fell at Silkaatsnek were buried in the pass but later removed to the Krugersdorp Cemetery
Second Battle of Silkaatsnek, 2 August 1900
In August Lord Roberts decided to evacuate Rustenburg and all positions west of Kommandonek and focus on the eastern Transvaal where he believed the Boer government was about to capitulate. Colonel Baden Powel in Rustenburg contested the decision because he believed that occupation of Rustenburg carried considerable psychological importance, but Roberts over-ruled him, and General Ian Hamilton was sent from Pretoria with a large force to re-occupy Silkaatsnek and Kommandonek and provide the evacuation of Baden-Powell and Kekewich with a safe escort.
On leaving Pretoria, Hamilton divided his force into two. One group approached Silkaatsnek from the north of the Magaliesberg, while the other, under Hamilton himself, attacked the pass from the south. After his victory at Silkaatsnek three weeks earlier, De la Rey had left a commando under Commandant Coetzee to hold the important position, but Coetzee lacked the tactical resourcefulness usually shown by the Boers. Hamilton’s men drove them back through the pass and by midday were forced to retreat to the north. However, the northern half of the British force failed to cut them off and the commando escaped.
Kommandonek was not defended by the Boers at all, and with both passes once again in British hands, Hamilton moved on towards Rustenburg. On 6 August 1900 Kekewich’s troops dismantled their fortifications at Olifantsnek and the following day he and Baden-Powell joined Hamilton at Kroondal to begin their journey eastward.
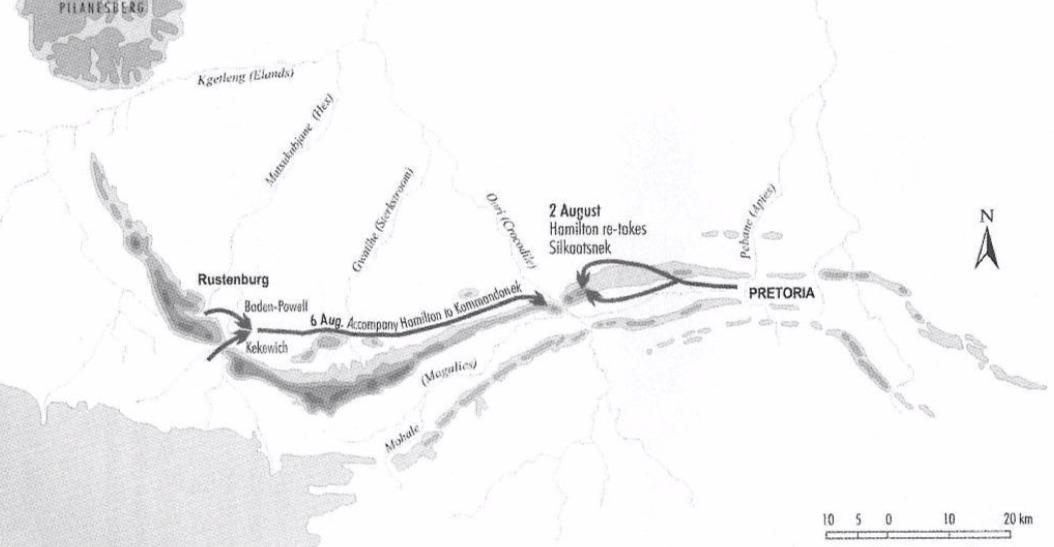
Sketch of Second Battle of Silkaatsnek
Main image: Fortified trenches of the Rietfontein Camp (foreground) facing Silkaatsnek centre distance (photo courtesy of Deon van Huizen of Kormorant)
About the author: Vincent Carruthers has written several books including The Magaliesberg (four editions), Cradle of Life (2019) and The Wildlife of Southern Africa (three editions). In 2006 he initiated the project to have the Magaliesberg region declared a UNESCO Biosphere Reserve. He has received awards from various institutions including the University of the Witwatersrand Gold Medal in 2016 and the North West University Chancellor’s Medal in 2013. He has been CEO of WESSA, chairman of Birdlife South Africa and member of the North West Parks and Tourism Board. Currently retired from his management consultancy, he is enjoying writing for the Magaliesberg Association for Culture and Heritage.
Further Reading on the Battles of Silkaatsnek
- Amery, L.S., ed., The Times History of the War in South Africa: 1899-1902. Vol IV. London: Sampson Low, 1906 - A comprehensive, seven-volume history of the entire South African War.
- Carruthers, V.C., The Magaliesberg: Biosphere Edition. 3rd edition. Pretoria: Protea 2014. Chapter 13 gives accounts of all the major South African War battles in and around the Magaliesberg.
- Wedepohl, A., The Battles at Silkaatsnek. 11 July 1900 and 2 August 1900. 2021. Available from: Magaliesberg Association for Culture and Heritage. Detailed descriptions of the two battles including excellent maps of the military positions.
- Wilson, H.H., After Pretoria The Guerrilla War. London: Amalgamated Press, 1902. A large-format, four-volume illustrated account of the war with many historically important photographs.